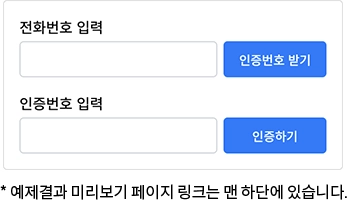
웹 애플리케이션에서 회원가입 또는 로그인과 같은 기능을 구현할 때, 사용자의 휴대전화 번호를 인증하는 과정은 중요한 단계 중 하나입니다. 이를 위해서는 인증번호를 보내고, 그 유효시간을 관리하는 타이머를 구현해야 합니다. 이 블로그 글에서는 jQuery를 사용하여 인증번호 유효시간을 표시하는 예제를 설명하겠습니다.
코드 구조 및 작동 방식
- 사용자가 전화번호를 입력하고 “인증번호 받기” 버튼을 클릭하면, 알림창과 함께 인증번호 입력란에 남은 유효시간 타이머가 표시됩니다.
- 유효시간은 3분(180초)으로 설정되어 있으며, 타이머는 1초마다 1초씩 감소하면서 업데이트됩니다.
- 인증번호 유효시간이 만료되면 알림창이 뜹니다.
HTML 구조
사용자가 전화번호를 입력하고 인증번호를 받을 수 있는 폼을 정의합니다. 입력 필드와 버튼, 그리고 인증번호 타이머를 나타내는 요소가 포함되어 있습니다.
 1
 2
 3
 4
 5
 6
 7
 8
 9
10
11
12
13
14
15
16
17
| <div class="join">
<form>
<label for="tel">전화번호 입력</label>
<div class="input_wrap">
<input type="tel" id="tel" name="tel">
<button class="btn_send">인증번호 받기</button>
</div>
<label for="code">인증번호 입력</label>
<div class="input_wrap">
<div class="code_wrap">
<input type="tel" id="code" name="code">
<span class="time"></span>
</div>
<button class="btn_auth">인증하기</button>
</div>
</form>
</div>
|
CSS 스타일
폼의 너비, 여백, 입력 필드 및 버튼의 스타일 등을 설정합니다.
1
2
3
4
5
6
7
8
9
| .join {width: 330px;margin: 100px auto 0;padding: 15px 15px 0;background: #fff;border: 1px solid #ddd;border-radius:4px;}
.join label {display: block;margin-bottom: 4px;font-size: 14px;color: #000;}
.join .input_wrap {display: flex;align-items: center; width: 100%;margin-bottom: 15px;}
.join input[type="tel"] {width: calc(100% - 106px);height: 35px;padding: 0 15px;border: 1px solid #ced4da;border-radius:4px;font-size: 14px;color: #000;}
.join .code_wrap {position: relative;width: calc(100% - 106px);}
.join .code_wrap .time {position: absolute;top:50%;right: 8px;font-size: 13px;color: #007bff;transform: translate(0,-50%);}
.join .code_wrap input[type="tel"] {width: 100%;padding-right: 50px;}
.join button {width: 100px;height: 35px;margin-left: 6px;background: #007bff;border: none;border-radius:4px;font-size: 12px;color: #fff;white-space: nowrap;transition: all 0.3s;cursor: pointer;}
.join button:hover {background: #0069d9;}
|
jQuery 코드
jQuery를 사용하여 인증번호 타이머를 구현하는 코드입니다. 사용자가 “인증번호 받기” 버튼을 클릭하면 타이머가 시작되고, 남은 시간을 표시합니다.
 1
 2
 3
 4
 5
 6
 7
 8
 9
10
11
12
13
14
15
16
17
18
19
20
21
22
23
24
25
26
27
28
29
30
31
32
33
| $(document).ready(function() {
let seconds; // 남은 시간 변수
let countdown; // 카운트다운을 관리하는 변수
const $timeSpan = $('.time'); // 시간을 표시할 요소
const $btnSend = $('.btn_send'); // "인증번호 받기" 버튼 요소
// 시간을 업데이트하고 화면에 표시하는 함수
const updateCountdown = function() {
if (seconds >= 0) {
const minutes = Math.floor(seconds / 60);
const remainingSeconds = seconds % 60;
$timeSpan.text(`${minutes.toString().padStart(2, '0')}:${remainingSeconds.toString().padStart(2, '0')}`);
seconds--;
} else {
clearInterval(countdown);
alert('인증번호 유효시간이 만료되었습니다.');
}
};
// "인증번호 받기" 버튼 클릭 이벤트 핸들러
$btnSend.on('click', function(e) {
e.preventDefault();
$btnSend.text('재전송');
alert('인증번호가 발송되었습니다.');
clearInterval(countdown);
seconds = 180; // 3분(180초)
updateCountdown();
// 1초마다 카운트다운 업데이트
countdown = setInterval(updateCountdown, 1000);
});
});
|
결론
jQuery를 사용하여 “인증번호 타이머"를 구현하는 방법을 살펴보았습니다. 이 예제를 통해 사용자가 전화번호를 입력하고 인증번호를 받을 때 시간제한을 설정하고 관리하는 방법을 배웠습니다. jQuery를 활용하여 웹 애플리케이션에서 시간 관리와 이벤트 핸들링을 손쉽게 구현할 수 있습니다.
